
ETA e-invoicing: setup
ekPOS issues e-invoices and e-receipts to the Egyptian Tax Authority (ETA), and credit notes for returns. This page covers the one-time setup; Submitting documents covers day-to-day use.
Open Integrations → ETA. The page has three tabs: Setup, Submissions and Item Codes.
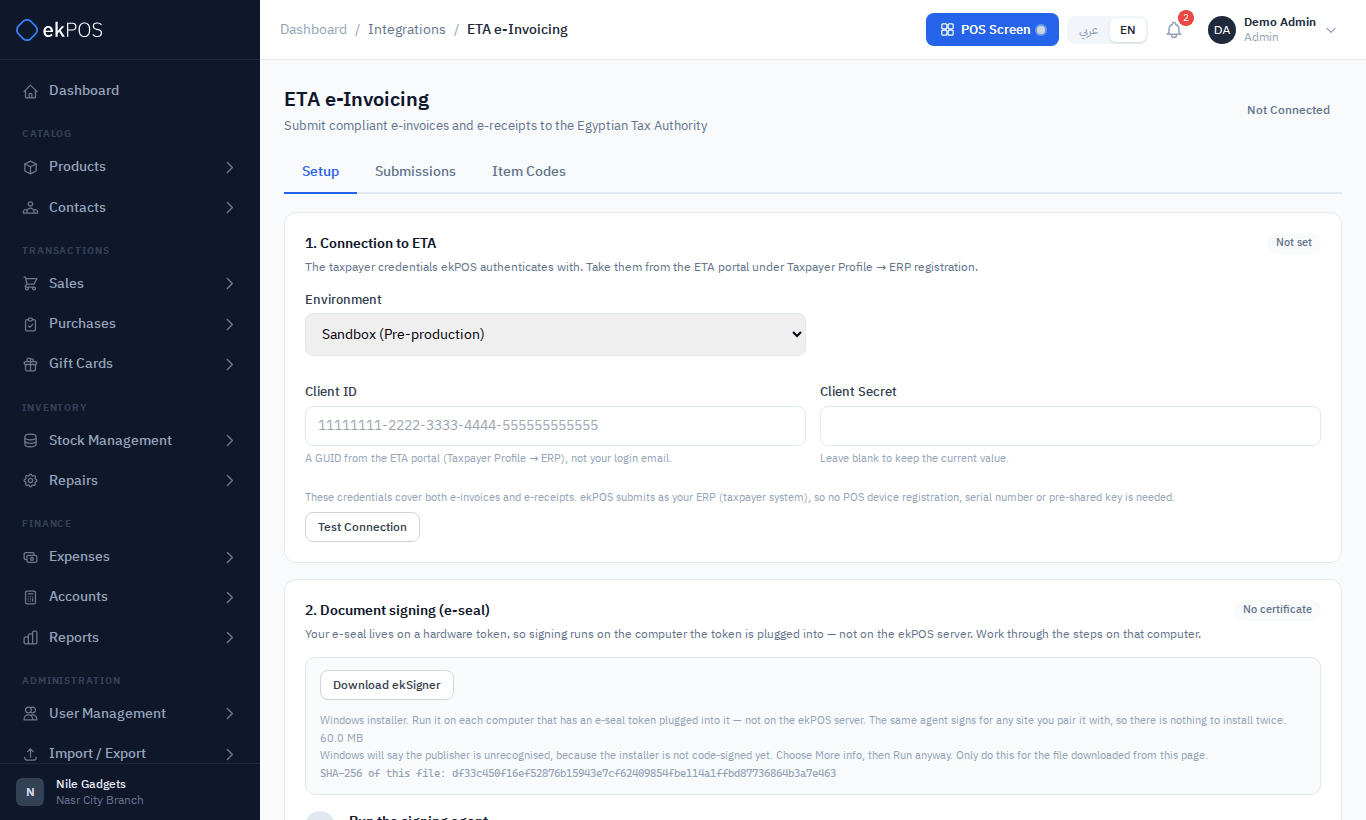
NoteThis page was written from the ekPOS screens and code. The demo account used for the screenshots is not connected to ETA, so the ETA-side results shown in your account depend on your ETA registration.
Invoice or receipt?
ekPOS decides for each sale:
| Customer | Document | Signature |
|---|---|---|
| Has a tax registration number | e-Invoice | Needs your e-seal |
| Walk-in or individual | e-Receipt | Not currently required by ETA |
| A return of either | Credit note | Needs your e-seal |
Before you start: your data
ETA rejects documents with missing identity details. Check these first:
| Where | What |
|---|---|
| Business profile | Legal / registered name, the 9-digit tax registration number, activity code, full legal address. |
| Branches | Location Code (ETA) — the branch ID registered with ETA (usually 0 for head office). |
| Tax rates | ETA tax category and subtype on each rate, e.g. T1 / V009. |
| Units | Unit Code (ETA) on each unit. |
| Products | An ETA item code — see Item codes. |
| Customers | For business customers: their tax number (not your own — ETA refuses an invoice issued to yourself), and a complete address — Building Name/No., Street Address, Neighborhood/City, Governorate and Country. ekPOS checks these before the document goes to your e-seal and names anything missing. |
1. Connection to ETA
- In the ETA portal, open Taxpayer Profile → ERP registration and register or regenerate your ERP credentials.
- In ekPOS, choose the Environment — Sandbox (Pre-production) for testing or Production.
- Enter the Client ID (a GUID such as
11111111-2222-3333-4444-555555555555, not your login email) and the Client Secret. Leave the secret blank later to keep the stored one. - Click Test Connection.
The same credentials cover e-invoices and e-receipts. The badge at the top changes from Not Connected once the connection works.
2. Document signing (e-seal)
Your e-seal lives on a USB token, so documents are signed on the computer the token is plugged into, by a small program called ekSigner:
- On that Windows computer, click Download ekSigner and run the installer. The file comes from ekSigner's public release page on GitHub. When the page shows the file's size and SHA-256, you can check the downloaded file against them; if GitHub can't be reached at that moment, the button still works but shows neither. Windows warns that the publisher is unrecognised; choose More info → Run anyway, and only for the file downloaded from this page.
- Start ekSigner and reload the ETA page.
- Pair ekPOS with ekSigner, using the pairing code shown on ekSigner's own page.
- Load certificates, then choose your organisation's e-seal certificate.
Until a certificate is chosen, Sign & submit stays greyed out.
3. Document preparation
Choose what ekPOS prepares automatically:
- Prepare an e-invoice when a B2B sale is completed.
- Prepare an e-receipt when a B2C sale is completed.
- Prepare a credit note when a return is finalized.
Set the Default Activity Code if it differs from the one in Business Settings.
Service item for shipping and extra charges
ETA has no field for shipping or extra charges, so ekPOS sends them as a line under a service item of your own. Register one with ETA (usually an EGS code, written EG-<your tax registration number>-<your code>), then enter its Code type, Item code and Unit here.
WarningUntil a code is set, a sale with shipping or extra charges cannot be sent to ETA; ekPOS says so instead of sending a document that leaves the charge out. ekPOS only accepts an EGS code that carries your own tax registration number, from Business profile.
NoteAutomatic preparation happens for sales saved on Add Sale or Edit Sale. Sales made at the POS are not prepared automatically; submit them from All Sales → ⋮ → Submit to ETA.
4. Per-branch POS device
e-Receipts must carry a device serial that ETA issued to you. Register a POS device for each branch in the ETA portal, then enter its Device serial here. The placeholder serial ekPOS generates keeps receipts well-formed but ETA rejects it (error CF317). The device Client ID and Secret are stored for future use.
Click Save; the connection is re-checked.
Item codes
Every product on an ETA document needs an item code that ETA has approved.
- A product with a GS1 barcode code: set Code Type GS1 and the ETA Item Code on the product.
- Otherwise register an EGS code: on the Item Codes tab, click Register with ETA (EGS) on the product.
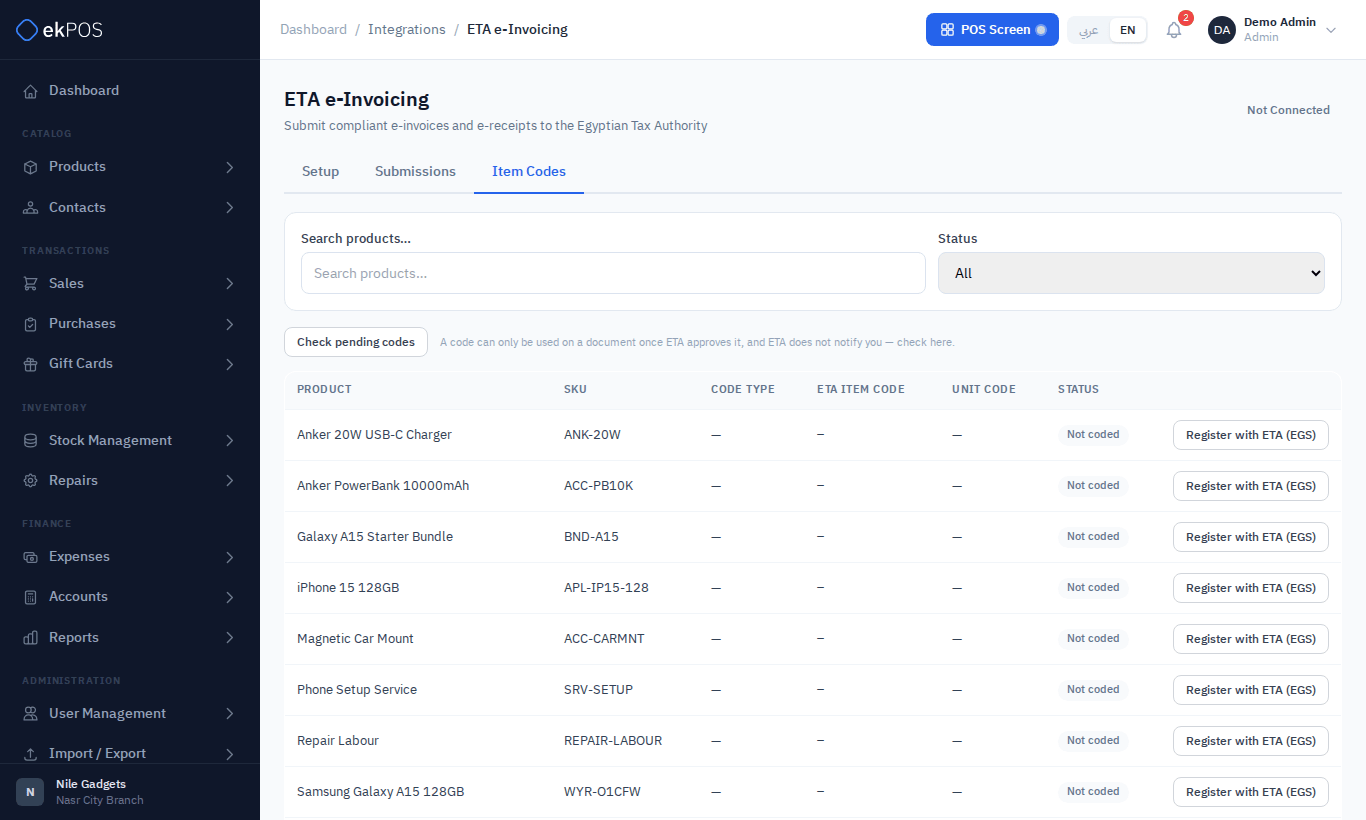
A registered code stays Pending until an ETA reviewer approves it, and ETA doesn't notify you. Click Check pending codes from time to time; codes move to Approved or Rejected. Filter by status to see which products still need a code.
Who can do this
| Permission | Allows |
|---|---|
| ETA → View | See the ETA pages and statuses |
| ETA → Manage | Change the setup |
| ETA → Submit | Prepare, sign, submit, refresh and cancel documents |